Configuring a Web Application Version
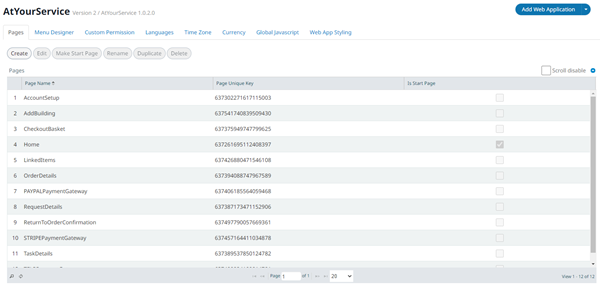
When you select a version of your web application for editing, the Version Edit page opens with the Page tab selected. The Forms list displays each web page. This section explains the use of the menu items on the editor page.

Page
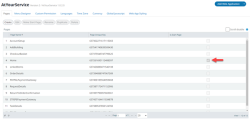
The Is Start Page column indicates the page that the application will first present to the user. To publish a version, one page must be set as the start page.
- To add a new page: click the Create button above the Forms table and supply a page name in the New Page pop-up. You can also set this new page as the start page at this point.
- To edit an existing page: select the page in the Forms table and click the Edit button. The page editor is loaded.
- To set or change the Start page: select the page in the Forms table and click the Make Start Page button.
- To rename a page: select the page in the Forms table and click the Rename button. Supply a new page name in the Rename pop-up.
- To duplicate a page: select the page in the Forms table and click the Duplicate button. Supply a page name in the Duplicate pop-up.
- To delete a page: select the page in the Forms table and click the Delete button. Click Continue in the Delete Page pop-up.
Menu Designer
The menu entries (tabs) may link to other pages in the application, or to external URLs. You can also build a parent tab with children (sub-menu items) that appear in a pop-up.
Access to menu tabs can be restricted for certain users by setting Custom Permissions described below.
- Create: You build each tab in the menu using the Create button.
- Edit: Use Edit to make changes to a menu tab.
- Delete: Use the Delete button to remove a selected menu tab; when deleting a parent, you must first delete all children.
- Import: Using the Import button, a menu may be imported from another web application version in the portal .
- Translate: For each tab in the menu you can provide a translation for other languages using the Translate button. See also Languages in topic Configuring a Web Application Version.
A worked example of menu design is available here: Menu Designer Tutorial.
Custom Permissions
When access is blocked to a control, the control can be displayed but disabled, or hidden entirely. For a menu, the menu tab is not displayed.
For a Control, the Permission is applied as a control property on the web page; see Introduction to Controls. For a Menu tab, the menu tab to be restricted is set when the permission is created.
Restrictions can be enforced for a user, a user group, or a role.
Adding a category
To make them easier to manage, Permissions are grouped by Category. You need to add at least one Category before you can add any Permissions.
To add a Category:
- Select the Custom Permission tab from the top menu.
- Select Category from the sub-menu.
- Click Create.
- In the New Category pop-up, type the name of the new category and click Save.
Permissions
Select the Custom Permission tab from the top menu and select Permissions from the sub-menu.
The Custom Permission list displays the existing Permissions:

- Create: Use Create to add a new Permission.
- Edit: Use Edit to make changes to a selected Permission.
- Delete: Use the Delete button to remove and delete a selected Permission.
To add a new permission:
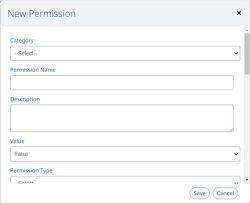
- Click Create.
- Complete the fields in the New Permission pop-up:

- Category: Select a category from the drop-down list.
- Permission Name: Type a name.
- Description: Optionally, type a description.
- Value: Select True or False.
- Permission Type: Select Control or Menu. When Menu is selected, select the menu to restrict access to from the Menu Name list.
- Apply the restriction to Roles, Users and User Groups as required, using the tabs.
- Click Save. The new Permission appears in the list.
Languages
To add a language:
- Select the Languages tab from the top menu.
- Click Create.
- Select the language from the drop-down list.
- Optionally select Is Default Language to make this language the default.
- Click Save.
The new language appears in the Language list.
To change the default language, select a language in the list and click the Make Default button.
See also: Using Languages Tutorial in the Tutorials section.
Time Zone
To add a time zone:
- Select the Time Zone tab from the top menu.
- Click Create.
- Select the time zone from the drop-down list.
- Optionally select Is Default to make this language the default.
- Click Save.
The new language appears in the Time Zone list.
To change the default time zone, select a time zone in the list and click the Make Default button.
Currency
To add a currency:
- Select the Currency tab from the top menu.
- Click Create.
- Select the currency from the drop-down list.
- Optionally select Is Default to make this currency the default.
- Click Save.
The new currency appears in the Time Zone list.
To change the default currency, select a currency in the list and click the Make Default button.
Global JavaScript
Global JavaScript is active on all pages in a web app. An example would be a function to initialise communications on a mobile device that you want to call from more than one web app page.
- Select the Global JavaScript tab from the top menu.
- Add the JavaScript code into the code editor window.
- Click Save at the bottom of the page.
Web App Styling
- Select the Web App Styling tab from the top menu.
- Add or change CSS properties in the code editor window.
- Click Save at the bottom of the page.
Note | When viewing the application after making changes to the Web App Styling, you must perform a forced clear of your browser’s cache; in most browsers, including Google Chrome, use key sequence Ctrl+F5.
You can see a simple example of using CSS in the Tutorials section: Global CSS Tutorial.

